
Introduction
In this post, you’ll learn how to perform a verbose restore on a 64 bits iPhone using checkm8.
While this should work on 32 bits devices too, I didn’t have time to try it out yet. I will update these instructions or make a new blogpost once I have done it on such a device.
Why do you want to do this ?
- Maybe because you are curious and wonder what’s happening behind the scenes. For sure,
idevicerestoreprovides a interesting log for you to read, but you could actually get much more than this simple log. - When trying to dualboot an iPhone, I have trouble with the
apfs_invert()method, and I thought comparing with a normal restore would help me diagnosing and hopefully solving my issues. - Although the restore log can be accessed via serial output, it requires a DCSD cable and, even if such a cable only costs around 30$, I didn’t have any DCSD cable to use. So, let’s use a free method until buying a DCSD cable !
Where to start ?
@nyan_satan wrote a simple tutorial which you can find here decribing how to patch graphical routines. While this is definitely a great starting point, we also have to load our patch files, and this is what this tutorial is all about.
The iOS restore process
I am not an iOS expert, and what I’m saying might be wrong. Read it at your own risk. The following explanations are based on what I know and have understood from this project. I can’t guarantee it’s 100% (or even 1%) true. You’ll have been warned.
Update or erase ?
For the sake of this demo, we’ll proceed to a so-called “update” restore.
With iOS devices, there are 2 restore fashions : “update” and “erase”.
“Erase” restores perform some more operations on the disk (they wipe user data), and unfortunately I’ve not been able to perform such restores with UI routines disabled. On the other hand, “update” restore seems more cooperative, so that’s the restore style we’ll use.
What happens during a restore ?
We’ll start with a device placed in recovery mode.
At this stage, iBSS and iBEC are already loaded and the device is waiting for the next boot images, including (but not limited to) kernelcache, a ramdisk and its associated trustcache, devicetree, etc.
But here, we don’t have to care that much about what has to be sent, because idevicerestore already sends all the necessary files for us in the correct order.
Our role “only” boils down to giving idevicerestore a valid IPSW file to work with.
This sounds simple, but since we are patching things out, we’re breaking the chain of trust at some point, and restore will thus fail if we don’t do anything.
What do we have to patch ?
During a restore, the restore software (either iTunes, idevicerestore, futurerestore or whatever) sends a ramdisk, among other files.
An IPSW contains 2 ramdisks, one for each restore type (their exact name can be found on The iPhone Wiki, in the Firmware Keys section).
Inside the ramdisks, at path /usr/local/bin is a Mach-O executable which effectively performs the restore operations on the device side (the PC also plays its role, but the iPhone’s restore code is located in this executable).
For “erase” variants, this executable is called restored_external while in “update” variants, it’s called restored_update.
This is the executable we need to patch : it’s responsible for performing the restore but also handles the UI part (displaying the Apple logo and the progress bar).
Some more complications
Of course, it would be too easy to just patch this executable, repack the IPSW and restore it, right ?
That’s because, when patching restored_update, we altered its signature. Of course, we will fakesign it with ldid2 but the kernel, if unpatched, will reject this signature.
So we need to patch the kernel (we’ll see how to do this later on). But patching the kernel alters its signature, so iBEC won’t load it. We thus need to patch both iBSS and iBEC and this brings us back to checkm8 !
Patching signature validations if what will make everything possible.
Since we are flashing patched
iBSSandiBECto our device, these images won’t be validated if SecureROM is not patched. In other words, after this restore, you’ll have to tether boot your device.
However, this can be easily reverted by restoring a normal IPSW : this will flash valid boot images, which will be booted untethered.
Credits
As I mentionned earlier, I got the idea to do this project thanks to @nyan_satan’s blog post.
I also followed @mcg29_’s dualboot guide for learning how to load a custom bootchain.
Requirements
Here are the tools you need for this project (I recommend you copy the compiled executables to /usr/local/bin on your Mac to always have them in your path) :
- img4lib aka
img4by @xerub - kairos by @dayt0n
- Kernel64Patcher by @Ralph0045
- ldid2 (install it with
brew install ldid2) - asr64_patcher by @md
- idevicerestore (compile everything with this by @matteyeux)
Before you begin
If you’re not really familiar with iOS boot/restore processes, I recommend you first do the following :
- Restore a normal IPSW with
idevicerestoreand read the log. - Read the dualboot guide by @Ralph0045 and @Ralph0045 and try it yourself.
- Verbose boot your iPhone. It’s an absolutely basic thing you MUST master well. It’s trivial, but do it by hand, not with checkra1n :)
The general idea
- Extract a release IPSW (the latest one, which can be restored without blobs). While it is theoretically possible to restore with
futurerestoreto an unsigned version, I didn’t try it yet and can’t confirm it works out of the box. - Patch
iBSSandiBECto load custom images ; and replace them in the original IPSW. - Patch the
kernelcacheto disable AMFI and replace it in the original IPSW. - Extract the “update” ramdisk and locate
restored_update. - Patch UI routines in
restored_update, restore its entitlements and fakesign it. - Patch
asrto force image validation. - Pack back the ramdisk.
- Pack back the IPSW and restore it.
You are free to organise the project’s folders as you wish, so be careful since your commands may vary from mine.
Copy-pasting is never a good idea, and you won’t learn anything.
As for me, I’ve created arestorefolder for all the stuffs with inside, the stock IPSW extracted in a folder calledstock, and the modded IPSW in a folder calledmodded.
Patching iBSS and iBEC
If you have already verbose booted your iPhone, this part should look familiar to you.
I’m using the kbag method to decrypt
iBSSandiBEC. Thanks to this, I don’t rely on keys from The iPhone Wiki.
For iBSS (for example), first extract its kbag
1
img4 -i iBSS.*.RELEASE.im4p -b
The kbag is the first line in the output.
Then, place your iPhone in DFU mode, exploit it with ./ipwndfu -p but don’t remove sigchecks yet ! Instead, run :
1
./ipwndfu --decrypt-gid=<kbag>
This is the decrypted kbag (aka dkbag). We can now use it to decrypt iBSS :
1
img4 -i iBSS.*.RELEASE.im4p -o ibss.raw -k <dkbag>
Then patch it with kairos :
1
kairos ibss.raw ibss.pwn
And pack it back to im4p :
1
img4 -i ibss.pwn -o ibss.im4p.pwn -A -T ibss
Note that unlinke the dualboot process, a verbose restore doesn’t need boot components to be signed ! In fact, you MUSN’T sign them ! Because
idevicerestorewill do this for you.
But when booting a ramdisk manually, you must send components that are already signed.
Do the same with iBEC, but don’t forget to add the verbose flag : kairos ibss.raw ibss.pwn -b "-v"
Finally, replace the original files in Firmware/dfu with these.
Patching the Kernel
The procedure is exactly the same as what’s described in the dualboot guide here.
That’s because we just need to patch AMFI, no need for anything fancier than that.
Here are the instructions :
1
2
3
4
img4 -i kernelcache.release.* -o kcache.raw
Kernel64Patcher kcache.raw kcache.patched -a
bsdiff kcache.raw kcache.patched kc.patch
img4 -i kernelcache.release.* -o kcache.im4p.pwn -T rkrn -P kc.bpatch
Note that we need to add the
rkrntag to specify our kernel is a restore kernel.
You can find a complete list of all possible tags here.
Finally, replace the kernel inside the IPSW with your patched one.
Patching the ramdisk
First, let’s prepare the ramdisk to access its content.
1
img4 -i <update-ramdisk> -o ramdisk.dmg
Then mount the ramdisk (either double-click on the dmg, or use hdiutil).
Patching UI routines
That is the whole point of what we want to do : disable UI routines.
First, load /usr/local/bin/restored-update in Hopper and search for a function called ramrod_display (as @nyan_satan describes here).
 Locate the _ramrod_display_set_progress function A function of interest here is
 _ramrod_display_set_progress which calls ramrod_display_set_granular_progress_forced.
The latter function seems to effectively perform the display-related operations, so we will disable calls to this function.
To do this, replace the branch operation in _ramrod_display_set_progress by a return instruction, as follows : 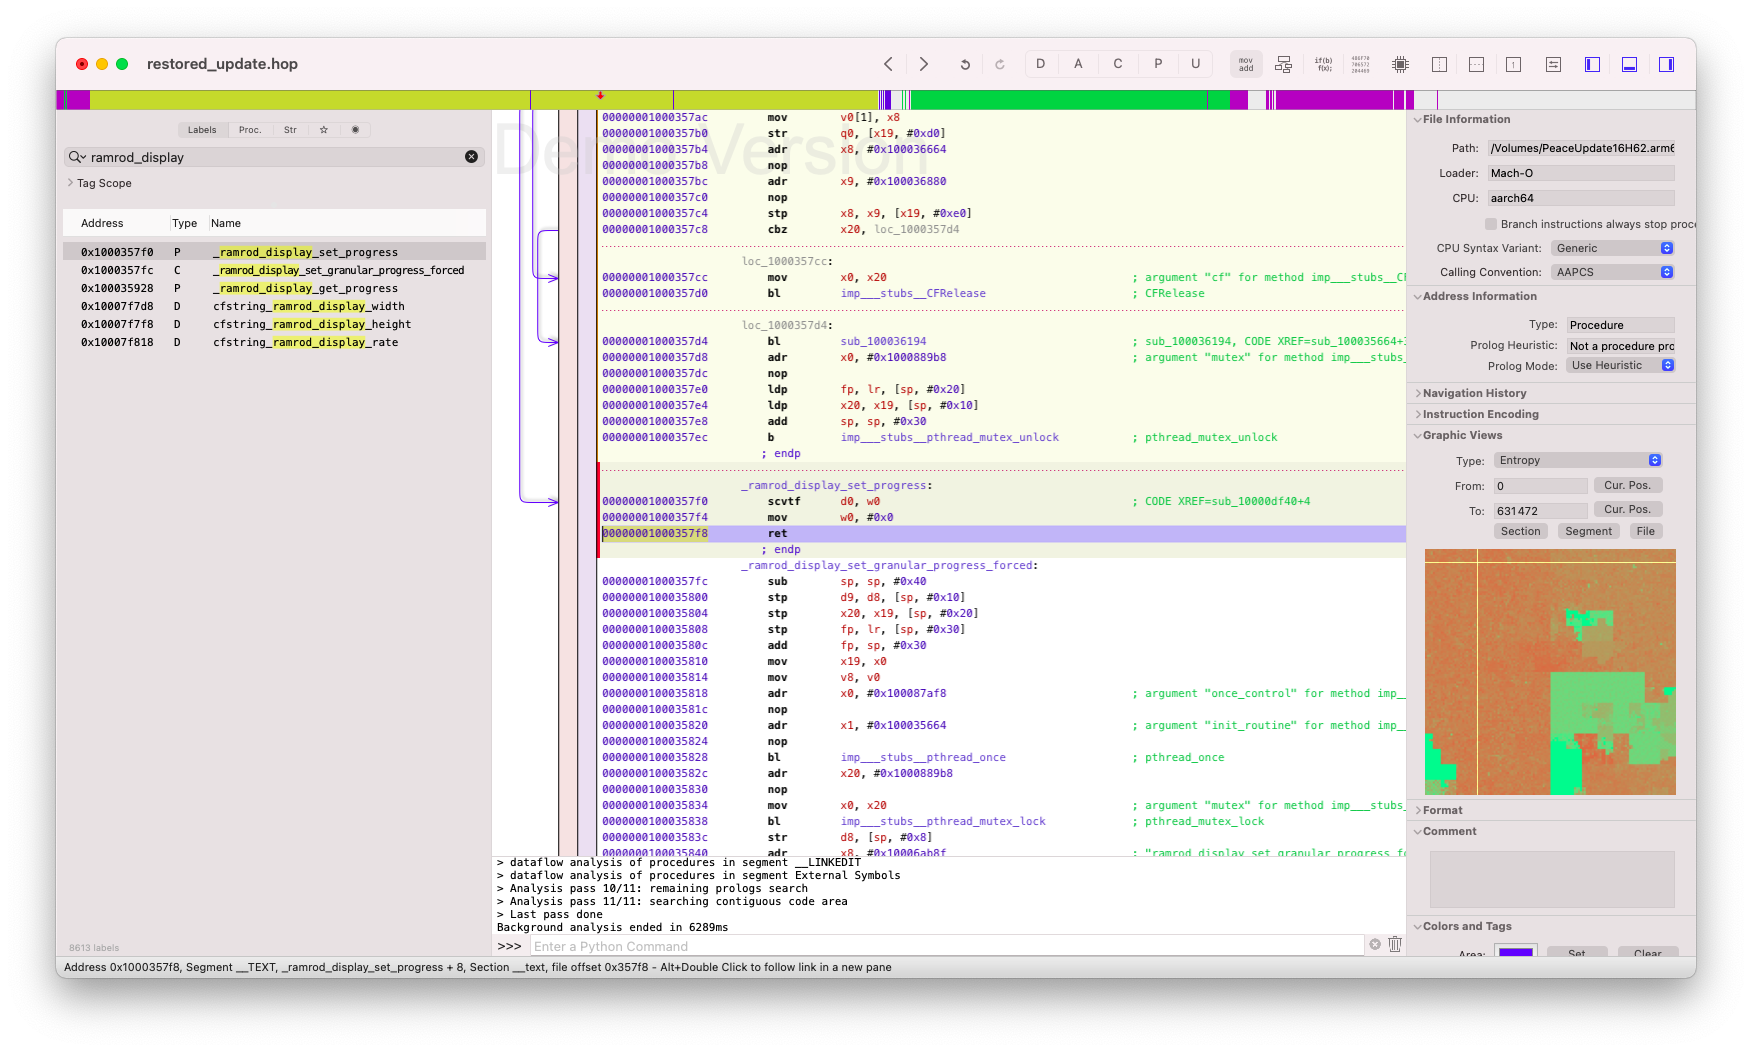 Branch instruction is replaced by a ret
Finally, follow my other blog post about Patching an executable with Python to apply this patch without a complete Hopper license. The method is strictly the same, and you shouldn’t have much trouble adapting this post to your case.
Once our patch is applied, we musn’t forget to fakesign the binary and restore its entitlements :
1
2
3
4
5
ldid2 -e restored_update > restored_plist.ents
patcher.py restored_update #This applies the patch
mv restored_update_patched restored_update
chmod 755 restored_update
ldid2 -Srestored_plist.ents restored_update
Patching asr
As shown in the corresponding page on The iPhone Wiki, /usr/sbin/asr performs a check that we need to patch.
While we could do this by hand, @md has written a convenient program which does this automatically : asr64_patcher
And of course, we mustn’t forget neither about entitlements and fakesign.
1
2
3
4
asr64_patcher asr asr_patched
ldid2 -e asr > asr_ents.plist
ldid2 -S asr_ents.plist asr_patched
mv asr_patched asr
Packing back the ramdisk
All operations on the ramdisk are now done, let’s pack it back for restore :
1
2
hdiutil detach /Volumes/*.arm64*RamDisk #Optionnal : unmount your ramdisk
img4 -i ramdisk.dmg -o <update-ramdisk-name>.dmg -A -T rdsk
Again, replace the ramdisk inside the IPSW with the one we just generated.
Packing back the IPSW
Be careful not to zip the folder containing your files, but the files themselves !
In the Finder, select all files, then right-click > Compress

If you want to do this programmatically (inside a script for example), do the following :
1
2
cd <the folder>
zip -r <output-path>/custom.ipsw *
The idea is that must be inside the folder already and zip all files next to you. If not, you will also zip the path to your files and that will corrupt your IPSW.
Preparing your device
Now we need to prepare our device to accept our custom IPSW.
While using ipwndfu is indeed the solution, here are the detailed steps.
First, prepare a “normal” combo of iBSS + iBEC that you would use for verbose booting.
In fact, they are exactly the same as what we generated earlier, but these DO NEED to be signed with an IM4M blob !
1
img4 -i ibss.pwn -o ibss.im4p.pwn -A -T ibss -M IM4M
Once they are ready, exploit your device with ./ipwndfu -p.
Then, remove sigchecks (python rmsigchks.py).
Finally, send iBSS and iBEC :
1
2
irecovery -f ibss
irecovery -f ibec
The device is now in pwnRecovery, and can still accept unsigned images.
Restoring
It’s the most trivial part of the job :
1
idevicerestore custom.ipsw
With this command,
idevicerestoreonly performs an “update” restore and thus, uses the Update ramdisk.
Specifying the--eraseflag will make it use the Erase ramdisk.
If you did everything carefully and correctly, you will see the complete restore log right on your device’s screen !
I’ve successfully done a verbose restore on my iPhone 5s.
— MachXNU (@MachXNU) April 30, 2022
I followed @nyan_satan’s blog post to disable the graphical interface, and then modified the Update Ramdisk to load it with checkm8 pic.twitter.com/WDmWTMequb
Conclusion
I tried to be as clear and explanatory as possible. However, if you’re still having trouble, feel free to contact me on Twitter or Telegram and I’ll do my best to help you !
And if you are thinking “Bruh, what a spoon-feeding tutorial for noobs”, remember that you’ve once been a noob too, and explanations are never useless ! Before knowing somehing by heart, you had to learn it and my goal is to make this learning easier and faster !